logo for better-photographs.com
Home
What's New?
Photography News
Essentials New Camera?
Technique
Composition
Lighting
Exposure
Focus
Your Rights
Improving Tutorial Articles
Tutorial Videos
Masterclasses
Workflow
Critiques
Top Tips
Your Questions
Some Answers
Product Reviews
Inspiration Galleries
Slideshows
Free Images
Stunning Locations
Top Photographers
Photo Ideas
The RPS
Good Books General Technique
Landscape & Travel
Wedding & Portrait
Wildlife & Nature
Underwater
DSLR Video Video Shooting
Video Editing
Video Sound
Editing Fixes & Effects
Horizons
Verticals
Red Eye
Too Dark
Distractions
Monochrome
Depth of Field
Cropping +
Extraction
Effects
Sizing
Framing
Background About the Editor
About this Site
Privacy Policy
Contact
Site Map

[?] Subscribe To This Site

XML RSS
Add to Google
Add to My Yahoo!
Add to My MSN
Subscribe with Bloglines

LEFT for better-photographs.com

Cut and Paste

"Copying part of one image to another."

Cut and Paste

Question from Brenda about transfering a part of one image to another
-

I want to cut and paste digital images of students in front of the gothic house for a parody on the American Gothic.  How do I layer the cut outs of students on to a picture of the house?  Sorry I feel rather computor dumb. Thanks

Answer -

Hi Brenda,

Thank you for contacting me.

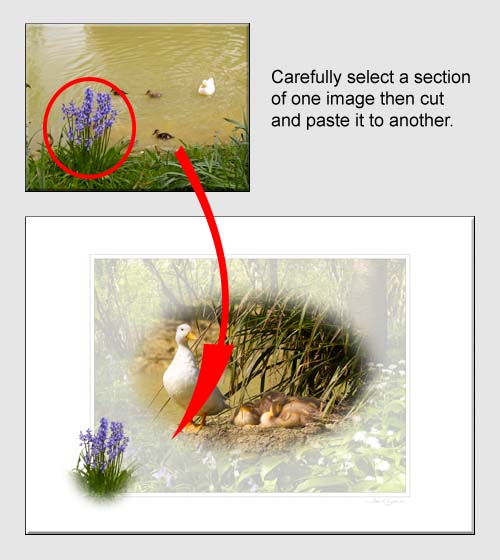
To transfer part of one image to another -

1 - Open all the images in your image editing software. I use Photoshop but the principle is the same in most software.

2 - Select the section you want from the photo of the student as explained in - www.better-photographs.com/image-extraction.html. Steps 8 to 10 cover the part that you want to perform. There are other methods of extracting but without seeing your images, I cannot advise. The magnetic lasso is a good all rounder. If your software has an option to "feather" the selection then I suggest you set this to 2 or 3 pixels.

3 - By holding the 'Ctrl' key and the left mouse button, drag the image section of the student across to the photo of the gothic house and release the mouse button. This will create a new layer which you can move and resize as appropriate.

4 - Repeat this for all the students. This will give you the background and a separate layer for each student in your final composite image which you can edit individually by selecting the appropriate layer.

5 - When all is done, flatten the image for saving/printing/displaying.

Don't hesitate to email me if you get stuck.

Best wishes,

John


SPECIAL REQUEST
- When contacting Better Photographs, please ensure that you supply your correct email address and that you follow the guidelines about whitelisting which appear with all our contact forms.

If you do not, our reply may not reach you so you may think we haven't replied and your time will have been wasted.


New! Comments

Have your say about what you just read! Leave me a comment in the box below.

Better Photographs


Photography Techniques


This Month's Free Image
Free Downloadable Photographs
Click here to download it.


Find It

Custom Search


Book of the Month
Creative Night
Click here to read the review.


All of the advice, tutorials, masterclasses and ideas on this website are available to you at no charge. Even so, its upkeep does incur costs.

You Are Secure!

If you feel that the site has helped you then any contribution you make, however small, would go towards its ongoing maintenance and development.

Thanks for your help.