

Calibrating the Camera Screen"Assessing exposure correctly using the LCD screen."You need to start with a calibrated camera screen In order to correctly assess exposure when shooting on location. This is a simple process but can often be overlooked. Here is a quick guide. 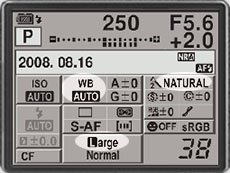 1. Start by setting your camera picture style
to STANDARD
(sometimes called NATURAL).
If you are
shooting RAW this has no effect on your final image as picture styles
are
overruled by Lightroom or Photoshop anyway. Set the white balance to AUTO white
- again, this has no effect on the final selections made when
converting your
RAW files. 1. Start by setting your camera picture style
to STANDARD
(sometimes called NATURAL).
If you are
shooting RAW this has no effect on your final image as picture styles
are
overruled by Lightroom or Photoshop anyway. Set the white balance to AUTO white
- again, this has no effect on the final selections made when
converting your
RAW files.The reason you can’t use RAW to do the same process is that Lightroom or Photoshop builds its own interpretation of the RAW data and to some extent plays a part in the exposure process. In practice, the differences should be negligible, but the image you see on the back of the camera is a camera processed jpg so it makes sense to compare this image with a hi-res version of the same in-camera processed jpg on your computer screen. If your
picture looks good on the camera screen, it is good.
 "Original article by Damien Lovegrove at www.prophotonut.com revised and updated by John Curgenven. All permissions granted."
|

 |
![]()
| Image of the Month |
 |
| Click here to download it. |
| Find It |

Custom Search
|
| All of the advice, tutorials, masterclasses and ideas on this website are available to you at no charge. Even so, its upkeep does incur costs. |
|
| If you feel that
the site has helped you then any contribution you make, however small,
would go towards its ongoing maintenance and development. Thanks for your help. |
| Book of the Month |
 |
| Click here to read the review. |
|
|