|
Image Sizing"All Things Great and Small"Image sizing is very important if the best results from our photos are to be obtained. Get it right and high quality images will be produced in the minimum of time. Get it wrong and time and storage space, along with ink and paper if prints are wanted, will be wasted. When we refer to size we usually think of centimeters and millimeters or feet and inches. Digital images are made up of microscopic elements that are too small for the normal units of measurement to be meaningful. These picture elements, known a pixels, can vary in shape and size but they are all extremely small and modern cameras have millions of them in their sensors (the digital equivilant of film negative). There are countless scientific papers that provide in-depth information about pixels but when it comes to image sizing, there are three things that really matter :- 1 - The size of the image that comes from the camera (or scanner). It is useful to address the medium first. There is an expression used all the time in digital imaging - resolution. This is basically a measure of the clarity of the image and is expressed as pixels per inch (ppi) or, when refering to a printer, dots per inch (dpi). (Note that the photographic industry has yet to change to resolution expressed as dots per centimeter.) The more pixels there are to an inch, the clearer the image will be. It might seem, therefore, that we should cram as many pixels into an inch as possible but there are sensible limits. Firstly, our eyes are not capable of appreciating an image resolved to much more than 300ppi and secondly, computer monitors, tv screens and colour printers all have their limitations. For example, most computer monitors cannot resolve to more than 72 ppi so there is no practical advantage to putting images with a higher resolution than this on a website. When it comes to printing, high quality is achieved at 300 ppi and this has become the standard for professional quality images. Photographic printers take the image and then print it to far higher numbers of dots per inch. This should not be confused with the pixels per inch we set for the image. The printer's software takes care of the transfer from ppi to dpi and we need not be concerned with it. The following examples illustrate the way in which the size of the image from the camera or scanner can be adjusted to achieve the desired size for the image to be viewed. SITUATION - A fortunate shot of a juvenile woodpecker in the front garden. Worth printing and showing to our friends on our website.
If only we could be sure of getting the image sizing right first time so as not to waste time, materials and storage space. Steps taken using Photoshop Elements version 5 
1 Open the image to be sized in an Edit window. It is preferable to use the Full Edit window as there are more shortcuts available. 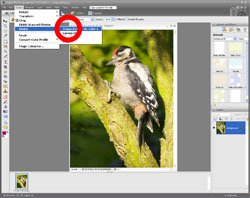
2 Select Image, Resize then Image Size... Alternatively, depress the Alt+Ctrl+i keys on the keyboard or, if the image is open in the Full Edit window, position the mouse over the bar at the top of the image, Right Click the mouse then Left Click Image Size... in the window that appears. 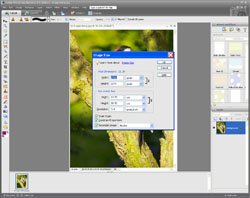
3 The Image Size window will open revealing its Pixel Dimensions, Document Size (a guideline as to the final print size depending upon the values set in the Print Options) and its Resolution. 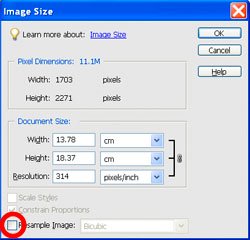
4 Ensure that Resample Image at the bottom is unchecked to ensure that the information in the image remains the same at this stage - (this will need to be checked in certain cases which are covered later on).
Case 1 Resize the image for display on a website or an email attachment. 
1 Enter the resolution suitable for an image to be displayed on a computer monitor = 72 ppi. Note that, because the image is not resampled, the Resolution, Width and Height are linked so the document's dimensions change. 
2 At 72 ppi, the image would take up far more space than most screens viewing a website would permit. To reduce its size to viewable proportions, check the Resample Image box then enter a reduced number of pixels. A width of about 500 pixels is suitable for most purposes. Click OK when image sizing is complete. Remember to save the new image with a different name so as not to overwrite the original.
Case 2 Resize the image for printing on post card sized paper. 
1 Enter the resolution suitable for an image to be printed at high quality = 300 ppi. Note that, because the image is not resampled, the Resolution, Width and Height are linked so the document's dimensions change. 
2 At 300 ppi, the image's dimensions are larger than needed for the paper to be used. Although modern printer software will take care of this, there is an opportunity to save storage space. To do this, check the Resample Image box then enter the paper's width. After doing so, if the height turns out to be more than the size of paper, enter the height instead. Click OK when image sizing is complete. Remember to save the new image with a different name so as not to overwrite the original. Case 3 Resize the image for printing on larger sized paper. 
1 Enter the resolution suitable for an image to be printed at high quality = 300 ppi. Note that, because the image is not resampled, the Resolution, Width and Height are linked so the document's dimensions change. 
2 At 300 ppi, the image's dimensions are not large enough for the paper to be used. Although modern printer software will take care of this, it is best to increase the image size in Photoshop. To do this, check the Resample Image box then enter the paper's width. After doing so, if the height turns out to be more than the size of paper, enter the height instead. Click OK when image sizing is complete. Remember to save the new image with a different name so as not to overwrite the original. These case studies cover the essentials of image sizing and further reading is available in the the help sections of imaging software such as Photoshop.

The following table gives a guide of the print dimensions and storage space required for this test image, shot at different sizes, when stored in jpeg format at the highest quality (12 in Photoshop). It is worth taking these sizes into account when adjusting a camera's image "quality" settings. For example, there is little point in setting the camera to Super High Quality if the images will only ever be used on a website. The fewer the number of pixels, the less space the image will take - more shots on the memory card. Conversely, if the image is intended for a large framed print then the more pixels the better for the finest level of detail.
Click here to add this page to your favorites in case you need a reminder about image sizing again.
This example is just one of the many ways in which Photoshop Elements or similar software can be used to help you make better photographs. Return from Image Sizing to the Photo Editing page. |


 |
| Image of the Month |
 |
| Click here to download it. |
| Find It |

Custom Search
|
| All of the advice, tutorials, masterclasses and ideas on this website are available to you at no charge. Even so, its upkeep does incur costs. |
|
| If you feel that the site has helped you then any contribution you make, however small, would go towards its ongoing maintenance and development. Thanks for your help. |
| Book of the Month |
 |
| Click here to read the review. |