|
Digital Landscape
Photography
"A guide to improve
your landscape photography."
20
Tips & Tricks to Achieve Professional Results
by Ricardo
Da Cunha
This
guide reveals 10 beginner tips and tricks to steer your digital
landscape
photography in the right direction and another 10 advanced tips and
tricks to build on the first and get you achieving professional looking
results with your DSLR in no time!
10 Tips and Tricks for the Beginner digital landscape photography
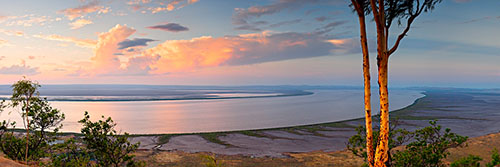
- Shoot close to sunrise and sunset to achieve more
balanced exposures.
Shooting during the harsh daylight produces very contrasty light and is
difficult to capture details in both the shadow and highlight areas. If
it’s one thing you take away from this guide it should be this!
- Compose an image to exclude more and include less;
remove any element
that does not add to the image. Simplicity is often the key!
- If your camera has it, shoot in RAW format for
maximum quality if any
post production editing will be performed later. This is really a big
deal!
- Switch to manual focus and focus one-third of the way
into a scene and
do not use the smallest aperture of the lens (i.e. f/22). Instead use
at least 2-3 stops wider from the smallest opening in order to achieve
sharper images.
- Use a remote cable release or the self timer in
addition to a tripod to
increase sharpness. This makes such a big different especially when
long exposures are required! To increase sharpness even further, engage
the camera’s mirror lock-up feature if it comes with one.
- Use Live View in conjunction with full magnification
to manually focus.
Thank goodness for Live View!
- Shoot waterfalls under overcast conditions in order
to allow the
shutter to remain open for longer in order to achieve that nice silky
water movement that you see so often and wonder how it is done!
Alternatively, shoot in shutter priority mode (Tv) and dial in a
shutter speed of at least 1/15 seconds or better still use an ND filter
to achieve the same effect!
- To achieve turquoise blue water, shoot when the sun
is directly
positioned overhead; i.e. around midday.
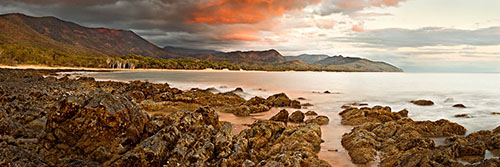
- Compose a scene with naturally occurring lead-in
lines within the
foreground and use them to guide the viewer to the main subject. An
interesting but not dominant foreground also give the image depth.
- Shoot at the lowest possible ISO (i.e. 100) to
produce the best
possible quality images. Using a tripod will be a big advantage! digital landscape photography

- Expose to the right. What does this mean? Using a
digital camera’s
histogram, ensure that the range of tones are pushed as far as they
can go to the right-hand side of the histogram graph without touching
the right-side. Doing this will increase the amount of information
recorded in the image and therefore quality!
- Don’t just rely on a single capture to create an
image. Taking two or
three different exposures and blend them together later in Photoshop by
combining the best elements of each. Yep – this is a big secret by the
pros!
- Wherever possible, try to avoid using filters as
filters typically
soften images and therefore reduce sharpness. As an example, instead of
using ND graduated filters capture one image exposed for the foreground
and another for the sky and then blend them in Photoshop. If you need
to use a filter to achieve an effect (i.e. using an ND filter to
achieve a silky water affect) then take a separate image without the
filter and another with the filter applied and blend in those areas
containing all of the juicy detail that you’re after!
- Always do your homework on a location in preparation
for a shoot and if
possible ensure that you have visited the location to pre-visualise the
optimum composition. Pre-visualise also how the scene would appear
under the optimum lighting conditions and then return well in advance
of the optimum lighting arriving (i.e. sunset). Use the harsh daylight
hours to perform your homework on a location.
- Take multiple captures of water movement until the
optimum water
movement has been captured. If the water movement is to slow, increase
the speed of the ISO and vice versa. Adjusting the ISO only ensures
that not only the exposure is left in tact but also the depth of field!
- Capture panoramic images by stitching multiple image
captures together.
Ensure that the camera is set to manual shooting mode, manual white
balance, manual focus, overlap each image segment by approx. 30% and
ensure the tripod is perfectly level. Positioning the camera in a
portrait orientation will also give you more scope when it comes to
cropping!
- In tricky lighting conditions, experiment using
different metering
modes rather than always rely on the Evaluative/Matrix metering mode to
determine the correct exposure. For example, use the Centre Weighted or
Spot metering mode.
- To yield optimum depth of field, use hyperfocal
focusing by identifying
the hyperfocal distance using both the lens focal length and aperture
and then focusing on the hyperfocal distance.
- To further improve depth of field and sharpness and
get images
appearing tact sharp from the near foreground to the distant
background, capture two separate images with the first focused on an
element in the foreground and the second on an element in the
background. Then blend the two images together later in Photoshop.
Photoshop makes this easy by automatically selecting the sharpest
sections of both images and combining them!
- Use The Photographer's
Ephemeris to research locations to shoot in
advance and easily identify sunrise and sunset times at any time of the
year for a specific location. This tool is a must have and best of all
it’s completely free!
digital landscape photography
Finally and most importantly of all, get out there and take lots of
images. Don't be afraid to make mistakes; going out shooting is one of
the best ways to learn and develop your style. Look, experiment and
most importantly of all learn! digital landscape photography
digital landscape photography
|
|

All of the advice, tutorials, masterclasses and ideas on this website are available to you at no charge. Even so, its upkeep does incur costs.
|
|
|
If you feel that
the site has helped you then any contribution you make, however small,
would go towards its ongoing maintenance and development.
Thanks for your help. |
|