

Better Digital Photo Printing"Requires Better Colour Management"
|
 |
The ultimate aim for
using
colour-management is to produce images from your printer that look
identical, or very similar, to what you see on screen. By doing this,
you can eliminate those horrible days of printing images two or three
times (sometimes more!) before they look the way you want them to. |
One of the main elements to getting your colour-managed workflow in place is to use “ICC Profiles”. An ICC (Image Colour Consortium) profile is a description of the colour-capability of a device. This can be an input device, your camera or scanner, as well as an output device, such as your own printer, or the printing machine that your professional printer will use to print your images for you. All of these devices are capable of capturing, showing or producing a specific amount of colours, and an ICC profile is a description of what they are capable of.
To put it bluntly, the more inks a printer uses, the wider its colour-capability will be. digital photo printing
Typically an ICC profile, in printing terms, is created for a particular type of printer using a particular media. For every different type of media you use, you will need an ICC profile for that media, even if you are using the same printer. ICC profiles can either be created using a device called a “Spectrophotometer”, or, more usually for home printing, they can be downloaded from a Paper manufacturers website for free. If you are using paper and printer from the same manufacturer, you may well find that you already have the ICC profile for that particular type of paper, especially if the paper was created for that particular model of printer.
Once you know that you have the correct ICC profile for your paper/printer combination, then it’s time to actually make use of it. This process is referred to as “Soft-Proofing”, and is normally done using Adobe Photoshop. digital photo printing
“Soft Proofing” an image refers to the method of viewing an image “through” the ICC profile of the output device (printer) that you will be using to generate your image as a final print. Soft Proofing is used to speed up the time taken to correct images for printing, and also to save ink and paper, as you do not need to print a hard copy of your image from which you then need to make changes. It allows you to make your changes once you have viewed your image on-screen, and “Soft Proofed” it using the relevant ICC profile. digital photo printing
Monitor Calibration digital photo printing
As a starting point, I would always recommend that you calibrate your computer monitor before attempting to Soft-Proof anything, as you need to ensure that your monitor is showing accurate colour. If you do not calibrate your monitor, then Soft Proofing will be no help in ensuring that your printed output matches your screen.
To calibrate your monitor, you can use your computer’s built-in software to calibrate by eye (refer to your operating system instructions for more information.) digital photo printing
Alternatively it is recommended that you buy a hardware device, called a “Colourimeter”, to calibrate your monitor. These are normally USB devices that are placed, loosely, on your monitor screen, and the software that comes with the device calibrates it for you. Once completed (usually within five minutes) the calibration data is saved to your computer, and the display then automatically uses this new calibration information. digital photo printing
Be warned!! If calibrating your monitor for the first time, you will normally have been using your monitor with too much brightness, so part of the calibration process will be to reduce the brightness of your monitor, which may then appear quite dull. This is normal, as most monitors are far too bright when you first use them. The human eye is quick to adjust to changes in brightness, and you will become more comfortable with the new settings very quickly, and then able to get on with Soft Proofing your images, and getting accurate prints out of your printer.
Your monitor will need to be calibrated on a regular basis, as they do tend to “drift” away from the calibration over time. It is worth doing at least once a month, or more regularly if accurate colour is very important to you.
Colour Settings in Photoshop digital photo printing
If you have never before looked at the Colour Settings section of Photoshop (any version), then it’s the first thing you need to look at. In Photoshop, go to “Edit – Color Settings…”, and the Colour Settings dialogue box will appear, looking something like this: digital photo printing
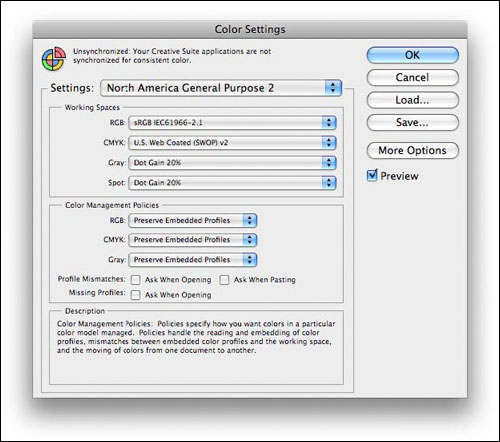
Photoshop will normally use the default settings, which tend to be for America, so I would always suggest you change these settings to best reflect the way that you have set up your camera. If your camera is set to capture images in sRGB, then set the RGB drop-down menu to sRGB. If your camera is set to Adobe RGB, then use Adobe RGB here. digital photo printing
Whether you use sRGB or Adobe RGB is a widely debated topic, with several different answers. My opinion, as a photographic printer, is that you can use whichever one more closely matches the printer that is going to print your images for you. If you are printing at home using a four, six or even eight-ink printer, then I would suggest using sRGB. If you are sending your prints to a professional printer, then they are more likely to have machines with a wider colour capability closer to Adobe RGB, so you could choose this to work with.
Steps to Soft Proof in Photoshop digital photo printing
Now that your colour-settings have been done, it is time to implement “Soft- Proofing”. You need to make sure that the relevant ICC profile(s) has been copied to the correct location on your computer hard drive, as follows:
Windows 2000, XP, Vista - C:/windows/system32/spool/drivers/color
Windows 95, 98 - C:/windows/system/color
Windows NT - C:/winNT/system32/color
Apple Mac OS 8-9x - System Folder > Color Sync Folder
Apple Mac OS X – Hard Drive > User > Library > ColorSync > Profiles
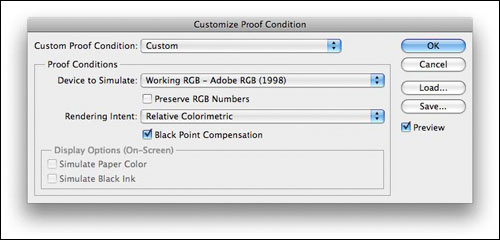
Once complete, restart Photoshop and go to the “View” menu, and select: “Proof Setup – Custom…”

This then brings up a new dialogue box, which, when viewed for the first time, will look similar to this: digital photo printing
Choosing the “Device to Simulate” drop-down menu brings up a list of every ICC profile that has ever been installed on your computer (whether you knew they were there or not!!) digital photo printing
Scroll down the list until you find the profile that you would like to use to Soft Proof your image on screen – for example, the one sent to you by PrintYours. The list can be quite long, so be patient, and move the cursor slowly through the list, which shows every ICC profile in alphabetical order.
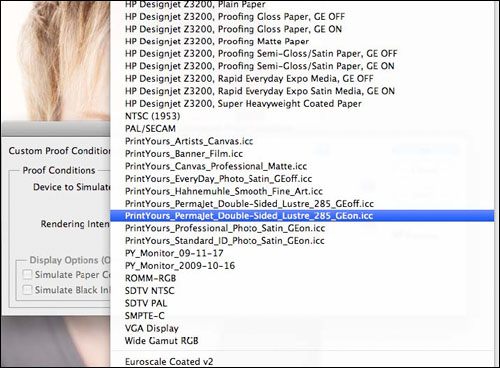
When you have located the correct ICC profile, click on it once, and the long list of all your ICC profiles will disappear, and the dialogue box should then look similar to this: digital photo printing
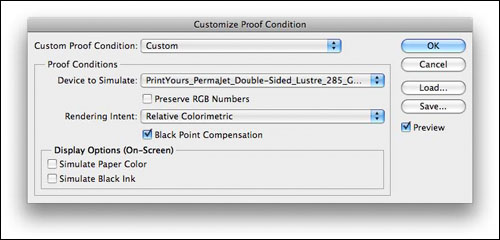
To keep the image as close as possible to your original working colours, make sure the “Rendering Intent” drop down menu shows “Relative Colorimetric”, and that “Black Point Compensation” is enabled, with a tick in the box.
If you are going to be printing at home, you might want to experiment with using “Perceptual” as the Rendering Intent instead.
By default the “Preview” box is always checked, so you can see what effect this profile might have on your image. It is always worth checking the “Preview” button on and off a few times, while you concentrate on the image itself, because this will give you a good idea as to whether the profile you have selected will change your image.
Once you have chosen your ICC profile to Soft Proof, and clicked the “OK” button, you will return to the main Photoshop window.
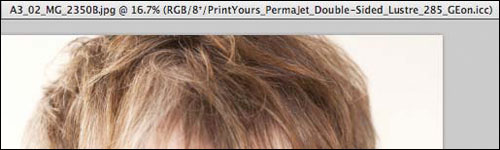
You will always be able to tell whether you are using a profile to “Soft Proof” with by looking at the image name along the top of your open image. When you are Soft Proofing an image, the name of the ICC profile that you are using is listed here, looking something like this:
Once you have used this Soft Proofing method, you can now make your Photoshop edits knowing how the image will look when it comes out of a specific printer, using a specific paper.
If you see no actual colour shifts, or see no effect of using this profile, that’s good news! It means that your image will print with no colour shifts or banding on the printer/paper combination that you have chosen.
Remember, every different printing paper that you use will need its own ICC profile, and you can use the Soft Proofing method outlined above to see what effect different types of paper might have on your image, helping you to choose which paper suits your image the best.
Printing at Home digital photo printing
When you are ready to print, it is worth making sure that the Photoshop Print Dialogue box mirrors what you have just done in Soft-Proofing. Choose the “Print”, or “Print with Preview” option (whichever brings up the Print dialogue box), and it should look similar to this:
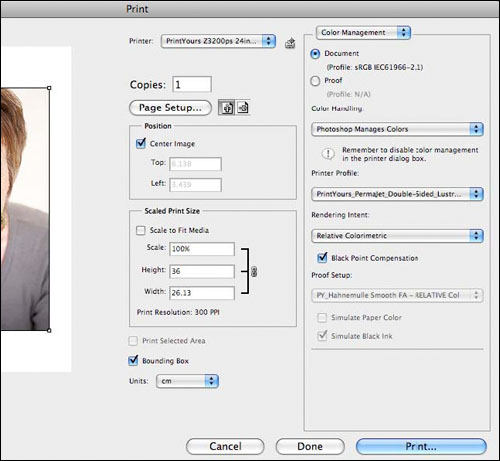
Make sure that you have selected your printer in the “Printer” drop-down menu, and set the correct page size for your print using the “Page Setup…” button. Ensure that the drop-down menu on the far right hand side of the dialogue box, at the top, shows “Colour Management” as the heading, and then work your way down the right hand side.
Ensure that “Document” is selected at the top (not “Proof”) and then choose “Photoshop Manages Colours” under the “Colour Handling:” header. For “Printer Profile” you need to drop this menu down and locate the same ICC profile that you used when you “Soft-Proofed” your image earlier on. Under the “Rendering Intent” I would suggest that you choose either “Perceptual” if you are using a printer with up to eight colours, or “Relative Colourimetric” if you are using a printer with between nine and twelve inks.
Finally, I always leave “Black Point Compensation” enabled, and the “Proof Setup” section at the bottom should always be un-selectable.
When you hit the “Print…” button, you then need to make sure that within the dialogue box for your own printer, you have selected the “Application Manages Colours” option, otherwise the printer will try to override all the Photoshop settings, and you will get an image that has been double colourmanaged, and you really don’t want that!!
As I am unable to test or show each Printer manufacturer’s version of their own print dialogue, I will need to leave you to find the “Application Manages Colours” area on your own. It’s there somewhere, but if you are having any difficulty locating it I would suggest contacting your Printer Manufacturer for more advice on finding this bit.
Colour Management is, as mentioned at the beginning, a very complex topic, but I hope that this has given you an insight into starting to use Soft-Proofing and ICC profiles to help you decide what type of media best suits your images, and that you actually get out of your printer what you are expecting to see.
|
Kevin
Dobson is an acknowledged authority
on Digital Photo Printing. He
studied Fine Art (many years ago!) and became involved with the
photographic and computer industries in the early nineties.
His varied career has seen him work with many of the Computer Industry leaders, such as Apple, Adobe, Hewlett Packard, Corel, Macromedia, Nikon and Wacom. |

 |
![]()
| Image of the Month |
 |
| Click here to download it. |
| Find It |

Custom Search
|
| All of the advice, tutorials, masterclasses and ideas on this website are available to you at no charge. Even so, its upkeep does incur costs. |
|
| If you feel that
the site has helped you then any contribution you make, however small,
would go towards its ongoing maintenance and development. Thanks for your help. |
| Book of the Month |
 |
| Click here to read the review. |
|
|