

Light Painting Photography"Creating your own Supernatural"
|
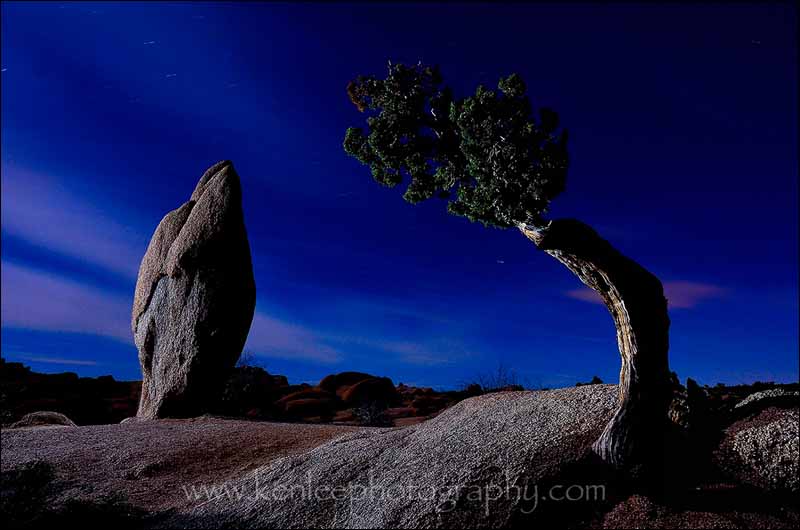 |
Winter Stone and Tree |
Larger
versions of the images in this
article and
detailed information about them can be viewed in a gallery.
Click on any image to see them.
detailed information about them can be viewed in a gallery.
Click on any image to see them.
| Ken
is an award winning photographer whose skill is evident in every
picture he captures. His technical knowledge, combined with his artistic eye and his passion for the subjects he finds, produces images of great beauty and vividness. It's always a joy to see his most recent work. |
 |
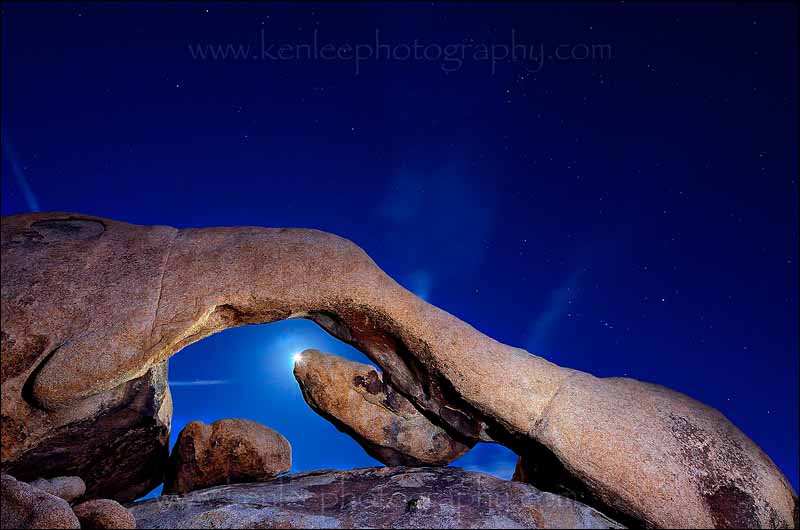 |
The Guardian of Forever |
Stuff We Need
- We need a camera. But you knew that, didn't you? And ideally, one that allows you to determine how long to keep the shutter open, and preferably, one with Bulb Mode, and accepts a remote shutter release. I use a DSLR, but I've had friends use a compact digital camera or film cameras to do this. What matters is that you can determine the length you wish to keep the shutter open.
- A remote shutter release. Why? To avoid
any movement of
the camera. Even minuscule movement can ruin your photo.
- A stable surface. If you're gonna leave your shutter open for several minutes, you're need a rock solid surface. Out in the field, ideally, you'll want to use a good tripod. Giotto, Manfrotto, Gitzo, and others make good tripods. I use a Feisol. I like lightweight carbon fiber tripods because I do a lot of walking around and hiking. As always, your mileage may vary, yes it may. Now, if you're gonna move the camera around, that's another thing, but today, I'm discussing techniques involving keeping the camera perfectly still. If it's windy and your tripod has a center hook, hang your camera bag or some such thing in the middle to further stabilize it so that camera that someone purchased for your previous birthday doesn't fall on the ground and shatter. That would suck.
- A light source or three. Flashlights,
headlamps, car
headlights, glow sticks, matches, candles, LED lights, stuff like
that.
And another thing I like to use is El Wire. El Wire? Yeah, El Wire. This is not Spanish for wire, no it isn't. It's short for electroluminescent wire. El wire is a copper wire coated in a phosphor, you see, and when you add juice from batteries, voila, it starts to glow! And in different colors! If you don't get one for light painting, you could go to a rave or tie it around as part of a costume!! Oh, the fun! And this stuff is easily available online, including Amazon.com. And it's cheap. Cheap. Fun. Artistic. Whaddaya waitin' for?
Camera Settings
As mentioned, I use a DSLR. You'll want to use Manual Mode so you can control the exposure time. Flip that to whatever you want. For this particular photo, I used Bulb Mode. This means that if I lock my remote shutter release, my shutter will stay open until I unlock the remote shutter release. Cool, eh? But you can also set your camera to 15, 20, 25, 30 seconds, whatever it has.
How The Heck Do You Focus In The Dark?
Well, look, if you're one of those persnickety photographers who actually wishes to have their subject in focus, then read on!! The easiest way to do this is to use your camera's auto focus. I know you're thinking, "Buh-buh-but it's dark! And my camera's gonna hunt! It can't focus when it's really dark!!!" And you'd be right! But no worries. Since you're all ready to light paint anyway, take one of those really bright lights you have, shine it at the subject, and let your camera's AF do its thing. When it has focused, carefully carefully switch your camera's auto focus off, switching it instead to Manual Focus, so that it's pre-focused. Voila. Done. See, wasn't that easy?
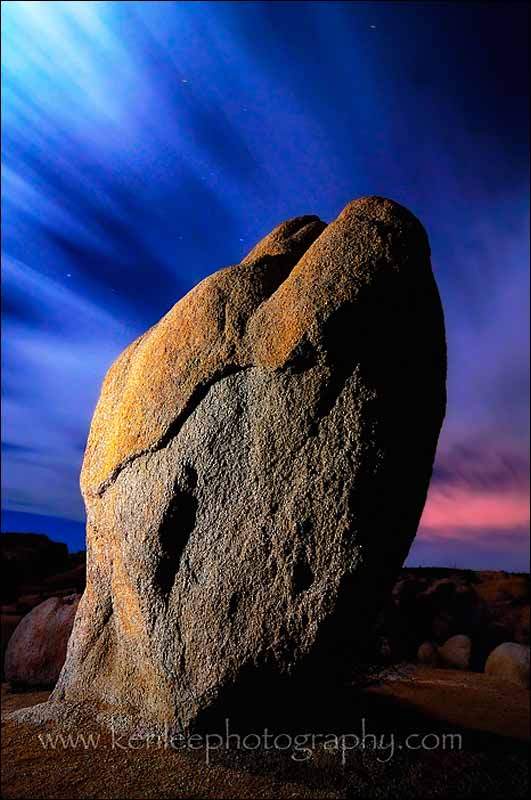 |
Alfa 177 |
Look how much you've learned already! You know how to set your camera, how to focus, you know how to light up your subject in the dark!! So next, let's check out a photo that shows both light painting outside the frame - illuminating the subject - as well as shining not one but two kinds of light into the lens directly. I used several light sources. Below is a photo which illustrates several techniques. Let's examine further!
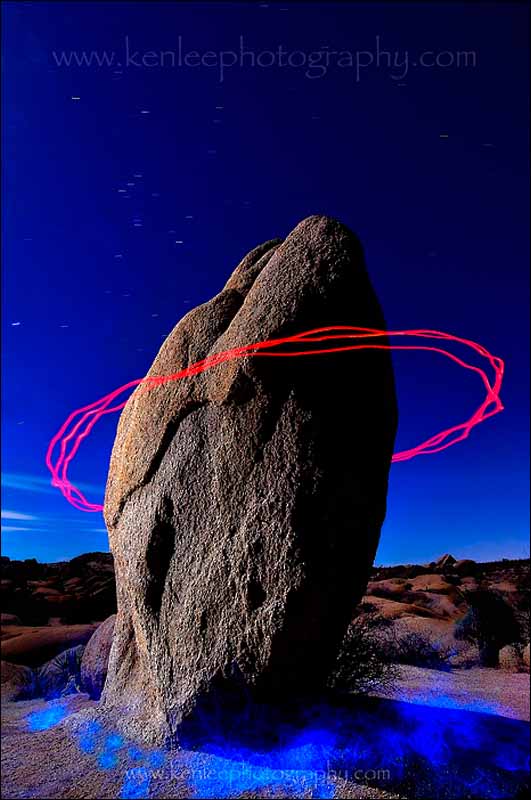 |
M-Class Planet |
- Rings Around The Stone: You can see three red rings around the stone, yes you can. These are from my Energizer headlamp. I set it to the red light setting, held it up high, and walked around the stone three times! Wheeee!! Why three? Uh, why not? For representing past, present, and future?
- Illuminating The Stone: I took that big yellow Dorcy spotlight, ran up to some rocks some 10 meters away and to the left, and pointed it at the rock, waving it around to illuminate it evenly. I think about how I want the stone and so forth to be illuminated, and in this case, since it was a full moon, I wanted to emulate how the moonlight was falling on the rock so it would look very natural. This giant flashlight is bright, so it doesn't take much to light up the rock, even from 10 meters away.
- Blue Mist: That's where the El Wire comes in. My El Wire 2.75 meters of glowing blue goodness. I activated it at the battery pack, then waved it around the base of the stone, almost as if I were sweeping the sand, waving it up and down. If you kept the wire still for a while, the shape of the wire would "imprint" on your image. I wanted more of an otherworldly mist, so I moved it around.
This is another photo that illustrates several of the light painting techniques we're discussing here!
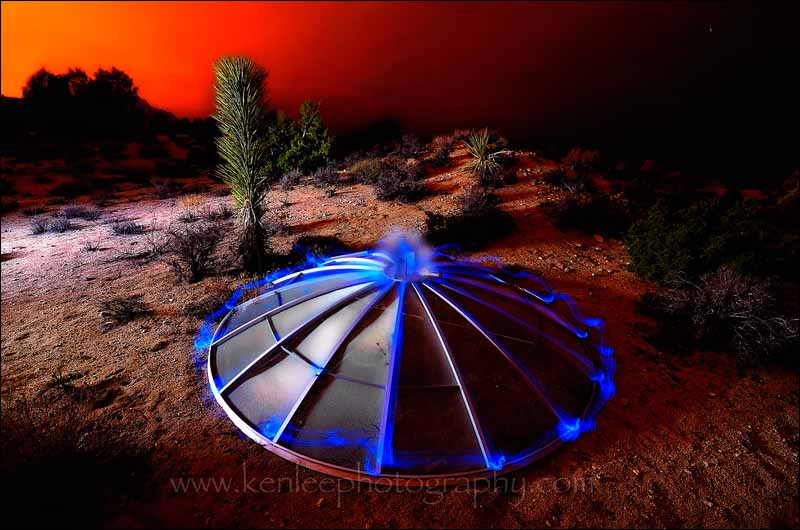 |
Martian Flying Saucer Landing |
This above photo of the Martian flying saucer showcases the blue El Wire again, much like the "M-Class Planet" photo. But here, the El Wire was used to highlight the structural supports and create a glowing globe on the top of the dome.
I hope this inspires you to try your own
light painting and long exposure photos. Take night sky photos,
light paint, do long
exposures. Do all three. Experiment. Have fun!
 |
Tower of Mordor |
|
More of Ken's superb Light
Painting Photographs can be seen in his gallery at www.kenleephotography.com.
He also writes a Blog featuring long exposure, night sky, star trails and light painting photographs at kenleephotography.wordpress.com and has a Facebook Page at www.facebook.com/kenleephotography. |
Recommended Reading for Light Painting Photography
- Creative Night: Tips and
Techniques - Harold Davis

 |
![]()
| Image of the Month |
 |
| Click here to download it. |
| Find It |

Custom Search
|
| All of the advice, tutorials, masterclasses and ideas on this website are available to you at no charge. Even so, its upkeep does incur costs. |
|
| If you feel that
the site has helped you then any contribution you make, however small,
would go towards its ongoing maintenance and development. Thanks for your help. |
| Book of the Month |
 |
| Click here to read the review. |
|
|