

Mastering Underwater Photography"The combination
of two great pastimes."
Dive Instructor and Photographer |
| There are millions of keen divers in the world but not many have mastered underwater photography. I have been instructing for 12 years and diving for 20 years, so have seen many divers through my time. |  |
 |
What are
the best ways to take great pictures underwater?
Firstly, the most important part of underwater photography is being a competent diver with good buoyancy. I was diving for 10 years before I dived with a camera, which even then sent my buoyancy off again. So practice is very important, as if you can not get in the right position you will never take a great shot.
 Diver
showing good buoyancy skills
|
Linked to the buoyancy skills you must be
able to stay still to get the
shot. One thing you can guarantee is that the fish will not stay still! So if you can be still this will increase your chances of removing the movement factor and getting the shot in focus. |
So how do you stay still if your buoyancy is perfect? Well it depends where you are, but if you are on a coral reef then it is not good or safe to hold onto or touch the coral as you will either kill, get stung, or both. Therefore why not use the sand on the side of the reef to wait for your shot.
If you are on a wreck, or more solid environment then you can find somewhere to rest and get in position. This is especially difficult in a strong current, which is when a metal hook stuck in the sand can be helpful, or even another diver to hold a rock with one hand and you with another whilst you concentrate on the camera work.
However at the end of the day you
are better to take a buoyancy
course like the PADI Peak Performance Buoyancy
Specialty.
There are some major differences from taking photos on the surface that the water has on photography as well - everything underwater seems to be 33% bigger and 25% closer. underwater photography
| This is not a major problem if you are
using the viewfinder,
but with beginner photographers it does tend to lead to a lot of
cropping
on the image to get the subject. The best way to combat this is to use
the rule - get
as close as you think you need too, then halve the
distance! But you can get too close so be careful to make sure you are still focusing properly! |
 |
Subject
and Positioning
When starting out, I always suggest to people that they do not try and take pictures of fish, but more still subjects such as Starfish, Nudibranchs, and Coral. underwater photography
Most underwater photographers will have experienced the phenomenon of fish bum! You set up the shot and just as you take the shot the fish turns to show us its best side! This is normally caused by divers chasing fish, but can happen with powerful strobes too.
With regards to positioning, it is similar to normal wildlife photography; you do not want to be taking a shot from above the subject. Most of the best results come from shooting either level with or even slightly below the subject. underwater photography
There are two reasons for this -
- The most interesting part of marine life for example is the face, therefore with very few fish having their face on top why take a picture from here.
- The second reason is that if you are above the subject you will cast a shadow on it.
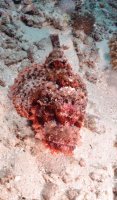
 |
A Bearded Scorpion fish, from
below
and in
front. Nikon D90 F11 16mm lens 1/160sec ISO 200 |
 |
The best advice I was ever given is to be patient. Find where the fish you want to shoot is and then get in the position to take the shot you want with background, foreground, lighting, then sit there and wait! Most of the world’s best pictures were taken like this.
The picture below was taken by Zac Macaulay of me with glass fish at the entrance to a cave. This shot took 30mins!!! Zac took about 100 shots, but they had fish in front of the diver, the lighting wasn’t right, the fish were not forming that lovely circle around the diver.
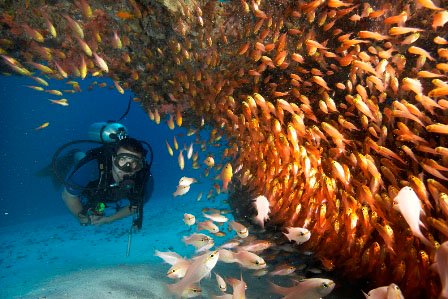 |
Picture by Zac Macaulay that took 30 mins and 100 shots to get right. |
It is a great shot and was worth it in the end, however whilst shooting this we missed a sailfish that passed the rest of the group. Unfortunately that is what you sometimes have to forsake for the best shots.
Equipment
 |
 |
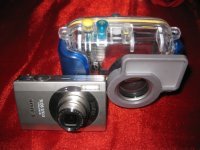
| Canon Ixus 90 and U/W Housing |
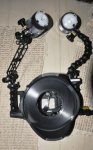
Aquatica housing for Nikon D90 with 2 110 Alpha Sea and Sea strobes |
| I
took up
underwater photography in 2000 starting with a Nikonos V,
then progressing to a Sony D9 4 mega pixels compact digital with a 60w
Epoque strobe. After working with the Sony for a while and finding its limitations, I moved to the Nikon D70 with Sea and Sea housing and then recently onto the Nikon D90 with the Aquatica housing with twin Sea and Sea YS110 alpha strobes. |
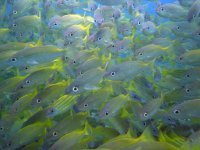 Yellow stripped snappers taken with a Sony D9 using an Epoque strobe |
SLR Cameras
As most people that shoot underwater will be using compact digitals with housings, I have not talked till now about aperture/shutter speed etc… However for those of you like me who are prepared to spend money and buy a housing for your SLR then here you go.
Aperture, as with land photography, is dependent upon your environment. If you were diving in dark cold water then you will probably be using a lower F-Stop than me, diving in Zanzibar’s clear waters.
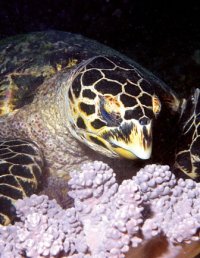 |
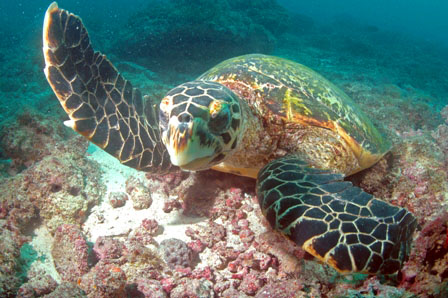
I
tend to shoot on F8 – F11 with a shutter speed of 1/160th sec. Using a high F-stop and lighting the subject can lead to some great macro results as you can see with the hawksbill turtle which was taken in the middle of the day. This can also be a great solution if the visibility is not so good. Hawksbill turtle - Nikon D70
60mm lens,
F22 1/160sec ISO 200
|
A lot does depend on your strobes too, as mentioned before I am using 2 powerful YS 110 alpha Sea and Sea strobes that are brilliant. You have to take into account the light is absorbed by the water faster than on land.
With my 2 strobes I can shoot them through about 5m of water but the strobe light does not reach anything further back. This can be seen below with the school of snappers, the closer ones are fully lit so we can see their true colours. Those at the back and the diver are only lit by the natural light, filtered by the water, which gives them a blue hue.
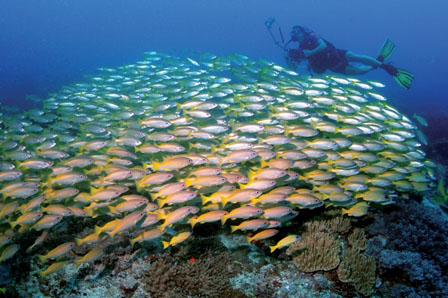 |
Diver with Blue stripped Snapper Nikon D70 F8 16mm lens, ISO 200 |
Even with a compact digital camera I would recommend buying a strobe to help bring out the natural colours. This will dramatically improve your shots, especially the macro ones. underwater photography
This is one of the most important parts of underwater photography, as I learnt to my cost. You have far more equipment for underwater photography than for land photography generally and far more points of failure. underwater photography
- Most importantly the main housing, this has at least 1 big O-ring between the back plate and main body. This O-ring is the main housing o-ring and should be greased with a thin layer of silicone grease after every use, whilst doing this make sure it is clean, even a hair can cause a leak.
- All the housing buttons have o-rings too but these should only be taken apart and greased by professionals. I suggest that having your camera housing serviced once a year to keep it in the best working order.
- When setting up your unit, test it for leaks in a pool or in the bath after closing the housing. Do this with the lens facing downwards so if there are any leaks they run into the lens port away from the camera.
- After you have checked for leaks take a picture to make sure everything works. I am sure that most underwater photographers will tell you they have got to the bottom of the ocean and realized they either forgot to put batteries in their strobes or to connect the sync cable to the camera. I know I have more than once.
- Once you have to camera tested and working properly do not open it again until after the dives!
- On a boat try to store the camera in a water bucket - even better if it is fresh water because it helps remove the salt from the camera. This is a great way of keeping the unit safe and also if you have any condensation inside the housing it will not form on the lens, like it would if it was in the sun.
- If you are on a 2 dive trip then do not even consider changing lenses between dives unless you have a very dry environment (not normal on a boat!) this can lead to leaks and mistakes. If you do change the lens etc… then make sure you do all the checks again before diving.
- After the dive before opening the unit, rinse thoroughly with fresh water. It is even better to leave it in a fresh water tank for about 30 mins if possible making sure that all the salt is taken off the unit. If possible whilst under the water in the rinse tank press all the buttons, and turn all the dials to make sure there is no build up of salt hidden.
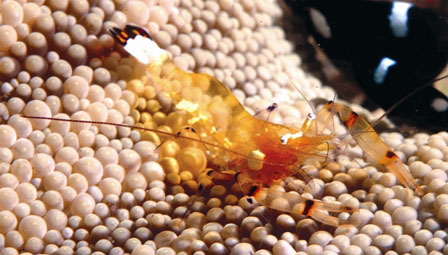 Magnificent Partner shrimp
Nikon D70 F11, 60mm lens, 1/160, ISO 200 |
Planning
a trip
When planning a trip as a diver you should ask the centre you are going to if they have the following -
- A dry area on the boat (if not that rules out changing lenses between dives)
- A water tank on the boat
- A fresh water rinse tank back at the centre
- A photographer on site (they will always be more accepting of other photographers and can tailor your dives)
Photographers always move a lot slower underwater than normal divers; this can mean diving in a group difficult. If possible ask for your own guide and be prepared to pay a little extra for it. In the end you can then move at your pace and tailor the dives according to your needs.
By planning and warning a dive
centre in advance you can get the best
out of your trip which will then allow you to concentrate on taking
amazing pictures.
More of Paul's superb Underwater Photographs can be seen in the gallery at his new dive centre http://www.seminolescuba.com where he can offer you expert underwater photography tuition. |
Recommended Reading for Mastering Underwater Photography
- An Essential Guide to Digital Underwater Photography - Michael AW with Mathieu Meur
- Digital Imaging for the Underwater Photographer - Jack and Sue Drafahl
- The Underwater Photographer - Martin Edge

 |
![]()
| Image of the Month |
 |
| Click here to download it. |
| Find It |

Custom Search
|
| All of the advice, tutorials, masterclasses and ideas on this website are available to you at no charge. Even so, its upkeep does incur costs. |
|
| If you feel that
the site has helped you then any contribution you make, however small,
would go towards its ongoing maintenance and development. Thanks for your help. |
| Book of the Month |
 |
| Click here to read the review. |
|
|