|
Too Dark"Lost in the Shadows"Important parts of an image can sometimes appear too dark. More often than not this is because the camera's exposure meter takes a general reading for the whole scene and it is not capable of recording all of the shaded areas (and sometimes the very light areas) with the desired level of detail. This usually occurs on days when there is bright sunlight casting dark shadows. Our eyes see all of the detail but the camera doesn't because it does not have the necessary dynamic range in it's sensor to cope. SITUATION - A busy market street on a day when the sky was cloudy but bright and the street was cast in shadow.
If only there had been a way of taking the photo so that the sky had not "fooled" the automatic exposure meter so that the street itself had not come out so dark. Steps taken using Photoshop Elements version 5 
1 With the image to be corrected opened in an Edit window, select Enhance, Adjust Lighting then Shadows/Highlights... 
2 A small window will open and the areas in the image which were too dark will lighten. Make sure that the Preview button is checked to see this and the effects of any further changes as they occur. 
3 To lighten the dark areas even more, adjust the Lighten Shadows slider. The sky in this image is a bit too light and this can be darkened by adjusting the Darken Highlights slider. 
4 Lightening shadows can result in an image lacking in contrast. The Midtone Contrast slider improves this. By tweaking the adjusters, the desired result in this example was obtained at LS=75%, DH=25%, MC=+25%. Click OK to return to the Edit window. 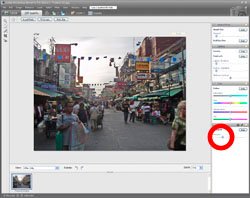
5 Finally, the image can be given a little more "punch" by adjusting the Sharpen tool. Be careful not to overdo this as too much will spoil the print - a 1/4 of the way across is about right for this example.
Remember to save the new image with a different name so as not to overwrite the original. Click here to add this page to your favorites in case you need to lighten areas that are too dark again.
This example is just one of the many ways in which Photoshop Elements or similar software can be used to help you make better photographs. Return from Too Dark to the Photo Editing page. |


 |
| Image of the Month |
 |
| Click here to download it. |
| Find It |

Custom Search
|
| All of the advice, tutorials, masterclasses and ideas on this website are available to you at no charge. Even so, its upkeep does incur costs. |
|
| If you feel that the site has helped you then any contribution you make, however small, would go towards its ongoing maintenance and development. Thanks for your help. |
| Book of the Month |
 |
| Click here to read the review. |