
[?] Subscribe To This Site


Video Sound "Ensure your Movie
has the best possible video sound track."
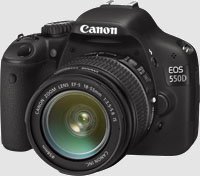
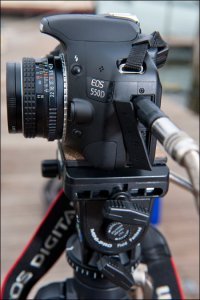
Original Article by Will HutchinsonLOOK. LISTEN. SHOOTTo a dedicated stills photographer, sound may only have reared its noisy head in the form of random canned music piped along to a slideshow. When it comes to making moving images of any length or genre however, sound should be considered with extra care. Ever since the release of the first proper talkie - The Jazz Singer, in 1927 - sound in all its forms has been inextricably embedded in movies, indeed some consider it to be responsible for as much as 90% of the whole movie viewing experience. While thinking about this extra dimension, I stepped out into the walled garden behind my office. I could hear the bang and crash of a neighbouring building site, the shouts of children at playtime in a nearby school, a distant siren, an aeroplane on its way to Heathrow, and several squawking seagulls. In just a few seconds, I heard and understood a complex and constant soundtrack, none of which I could actually see, but all of which I could distinguish perfectly.  AUDIO RECORDING: BASIC TIPS Lights, camera, SOUND, action! The single best piece of advice is simply to be conscious that you are recording audio, and that you have another set of factors to consider before hitting ‘record’. As well as looking at your subject, listen to it. Are you shooting directly into the wind? Can you wait until that ambulance has passed out of earshot? Is your subject clearly audible? Sound should be considered equally important as exposure or focus. Have you got the best composition for both sound and picture? Be aware that audio recording is also sensitive to sound outside your field of view, and that, while people talking behind the camera won’t be seen, they will most certainly be heard. Don't be afraid to use the legendary words, 'Quiet on set!' Cutting from one shot to another at the editing stage creates discontinuity, but having an audio track that blends between shots can restore this continuity. With this in mind, hold your shot a little longer at the start and end of a take, to give you some leeway in the edit, and consider recording some background noise to add ambience later. If you are outside in a windy situation, find somewhere sheltered from direct wind, and record some atmosphere from there. Adding this audio at the editing stage balances out the cuts and adds depth to the scene. MIC: BUILT IN OR STANDALONE? If you can record sound separately, you probably should - the results from a dedicated recorder and microphone will undoubtedly be superior to sound recorded directly from your camera’s mic. However, as well as the additional cost and hassle of syncing separate audio, the benefits of shooting HD video on a small, unobtrusive device are negated if you need an extra pair of hands for recording sound. If you don’t record audio separately, a dedicated microphone will help improve results, especially if recording outside. You could consider a directional mic such as the Rode NTG-2, with a separate baffle (the cost, size and unwieldy nature of this make it only of interest for more serious productions), or a simpler all-in-one model like the Rode Videomic. I conducted some tests using the built-in mic on a Canon EOS 550D and the two Rode mics mentioned. The EOS has an autogain function, which renders these tests imperfect, but they still show clear differences in quality. CANON EOS 550D BUILT-IN MIC
Most built-in mics are also very sensitive to autofocus noise, and to any noise conducted through the body of the camera. So don't use autofocus during filming, and be careful with any hand movements. RODE VIDEOMIC
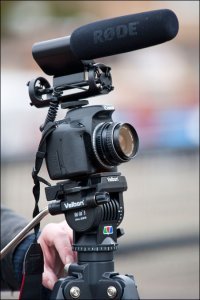
The directional nature of the mic also tends to improve the issue of autogain picking up and amplifying external environmental sounds in quiet indoor conditions, resulting in your subject being more clearly heard. The only downside I could see to this mic is that the rubber mounts holding the mic on the shock mount are quite flimsy, and the mic is not very well protected, so you wouldn't want to throw this in your kit bag without finding a solid case for it. RODE NTG-2 AND RODE BLIMP
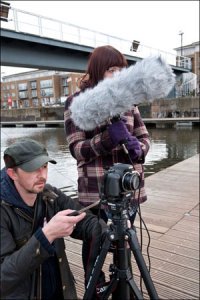
I used the Rode Blimp to house the mic, which is very solid, protecting the mic completely, with an outer shield and an antishock sling mount. Along with the included furry baffle, this cut wind noise almost entirely, even in the windiest of conditions. While being a great professional solution, this does however necessitate a second person to hold the mic while recording.
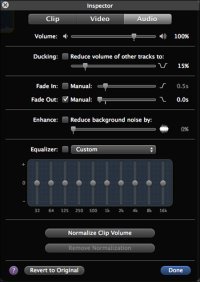
EDITING As with all editing, some degree of post production will be beneficial to your film's audio track. If you simply cut between shots without any fading, cross mixing or audio levelling, you will hear changes in background noise clashing. Apple's latest editing incarnation - iMovie 11 - is now available as a single application download from its app store, and has much improved audio controls. These include a simple visual view of the sound wave below the main image on the timeline, draggable volume and fade points, noise reduction, and a 10 band equaliser, all of which can be set individually for each clip. Audio editing can be split into two processes - the main edit and bedding in. The main edit consists of balancing the volume of individual clips, adding and adjusting fades, removing pops, hisses and hums; while bedding in is the final addition of background sounds, sound effects and music, to restore continuity to your edit, and to obtain a fully balanced and engaging sound track. MAIN AUDIO EDIT Overall Balance iMovie 11’s visual waveform enables you to balance the volume of the audio for an entire project accurately and easily. The higher the wave, the louder the sound, so by dragging the volume of two adjacent clips until the waves are similar in height, you can match their overall output. 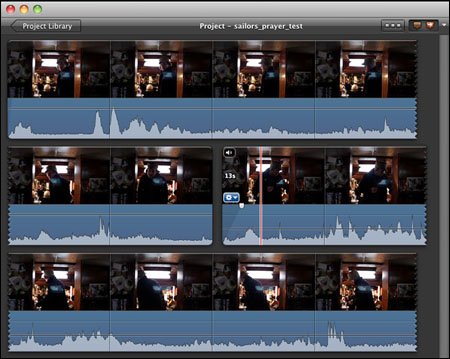 Judge the best volume from a single clip, and then match other clips to this as best you can. Fading
Remove Background Noise You can use the dedicated slider to reduce background noise, but use it sparingly, as it tends to destroy the quality of the main audio. The equaliser can be a more useful tool. Use the 10-band equaliser to add more bass or treble, remove hum, or individually tweak your audio. The equaliser has some presets, but you can also use it to isolate frequencies and remove specific sounds, such as aeroplanes, quite successfully. To do this, find the clip in question and play it through, while systematically raising and lowering each band in turn, until you can isolate the frequency with the rogue noise. Then just lower this slider until the noise is gone, or at least acceptable, without ruining the overall balance of the clip.
BEDDING IN Adding Ambient Sound you have Recorded If you drag a clip containing some ambient sound you recorded to your timeline, you can detach the audio from the clip (CLIP > DETACH AUDIO) and then drag this audio clip to another part of the movie, adding atmosphere and helping to mask the audio clipping between edits. Add Sound Effects iMovie comes with a limited sound effects library. Click on the audio tab, and you will see a list of available sounds - simply drag to the timeline to add one. Adding additional background sound is an effective way to 'bed in' your audio, and to mask edits with a continuous ambience, but make sure that you adjust the volume as necessary so that it is indeed 'background' sound. You can also find huge libraries of 'royalty free' and even plain 'free' sounds on the internet. Do you need the sound of a golf crowd? Audience applause? A creaking cartwheel? It's not as hard as you might think, and while this may sound like so much unnecessary fakery, you will be surprised how much difference a bit of well produced background ambience can make. Add Music As well as covering a multitude of audio sins, a bit of well chosen background music can really add to the atmosphere. Choose from your own library of music in the audio section, and drag to the timeline to add, balancing the volume as always.
CONCLUSION Sound plays an important part in any film, so give yourself the best chance of using it well by treating it seriously from the start. Expose and compose for sound as well as image. At the editing stage, edit for story and continuity first, and then clean up the basic audio tracks before 'bedding in'. "Article
first published in the RPS
Journal February 2011 - No reproduction
without permission."
Will
Hutchinson has had an enduring interest in Photography since working in
the industry in the early 1990s. He has recently established his
own design and film production company - Hutch Films |

 |
![]()
| Image of the Month |
 |
| Click here to download it. |
| Find It |

Custom Search
|
| All of the advice, tutorials, masterclasses and ideas on this website are available to you at no charge. Even so, its upkeep does incur costs. |
|
| If you feel that
the site has helped you then any contribution you make, however small,
would go towards its ongoing maintenance and development. Thanks for your help. |
| Book of the Month |
 |
| Click here to read the review. |
|
|