
[?] Subscribe To This Site


Digital Photography Workflow
|
| Backup to Portable Hard Disk |
 2 - Copy Images to PC. At the end of
a day's shoot I load the raw images
from the card or the Portable
Hard Disk (not the camera) to my iMac
into a sub-folder "project" within "month"
within "year" within a main folder "Awaiting Process".
2 - Copy Images to PC. At the end of
a day's shoot I load the raw images
from the card or the Portable
Hard Disk (not the camera) to my iMac
into a sub-folder "project" within "month"
within "year" within a main folder "Awaiting Process".It suits me to organise this way as I'm pretty good at remembering when I shot an image. The "Preserved Filename" in the metadata is very useful when my keywording practices have been slack or a search on keyword brings up a lot of images. If I'm looking for an image which I have processed in Adobe RAW or Lightroom and then in Photoshop, a search on the "Preserved Filename" finds all versions of the image very quickly. photography workflow
 |
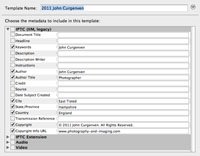 |
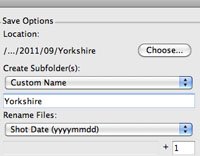
Whilst loading, I use the Adobe Bridge Photo Downloader function to rename the filenames with the date and image sequence number. I use a generic template to add to the metadata - copyright information, my contact details, my name in the keywords etc. I add project and image specific metadata later on after the selection stage. photography workflow
One of the Advanced Options in Photo Downloader is to "Convert to DNG". There are advantages in doing this, especially with brand new camera models for which it may not be possible to process their RAW files in the version of Adobe Camera RAW or Lightroom you are using. I do not convert because I find that the DNG files produced are considerably larger than the Olympus .orf files from my cameras.
| Backup to Computer's External Hard Disk |
 3 - Select the Best.
Because of my "Shoot
as if using film"
practice, my keep rate has increased significantly. Even so, there are
inevitably shots to be discarded so this is where I do it. Not in the
camera because to do so there would waste time and battery
life.
3 - Select the Best.
Because of my "Shoot
as if using film"
practice, my keep rate has increased significantly. Even so, there are
inevitably shots to be discarded so this is where I do it. Not in the
camera because to do so there would waste time and battery
life.When selecting images to keep I mainly look at composition - in three dimensions. What's in (and not in) the image and depth of field.
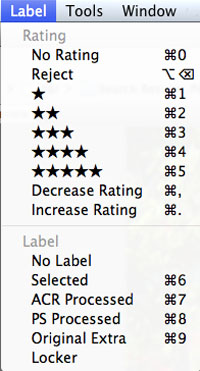
If the image is not just right, I think about whether cropping, subject selection and blurring will give me the result I envisaged when shooting. If the image passes this scrutiny it gets selected - by labelling it Red.
Anything not labelled Red will be binned when the project is completed. I used to keep everything but time has taught me that I have never wanted or needed an image once a project has been "put to bed". photography workflow
More keywords including gallery category and appropriate descriptions etc. are added to the metadata of the selected images. This stays with all versions of the image throughout the workflow process.
| Backup to Computer's External Hard Disk |
4 - Process RAW Images. Unless I'm processing a large batch of images, I prefer to use Adobe Camera RAW rather than Lightroom. I have tried various Olympus software and Capture NX but I still find ACR best suits my needs.
 i
do as much processing as possible at this stage including Spot
Removal, Straightening, Sharpening (using presets designed for
different image types), Cropping as well as all the usual
"Developing" with a view to producing jpegs of good quality for
displaying on my websites and social networks.
i
do as much processing as possible at this stage including Spot
Removal, Straightening, Sharpening (using presets designed for
different image types), Cropping as well as all the usual
"Developing" with a view to producing jpegs of good quality for
displaying on my websites and social networks.I find that the 80-20 rule generally applies here - the image is at least 80% as good as it will ever get in 20% of the time it takes to achieve perfection.
Images are usually viewed very quickly on websites and client's screens are rarely calibrated correctly anyway.
This obviously means that certain refinements which I will do later in Photoshop are missed, but I like to post results as soon as possible, especially after events where clients are keen to see results.
I have studied other websites, some quite famous, which specialize in events and have noticed that their displayed images are straight out of the camera - sloping horizons, poor exposure, lack of suitable cropping etc. I prefer to present work which has been processed through ACR at the very least, even if the Photoshop refinements are completed later on.
These ACR Processed images are now labelled Yellow and moved to a corresponding sub-folder set within a main folder - "Processed".
| Backup to Computer's External Hard Disk |
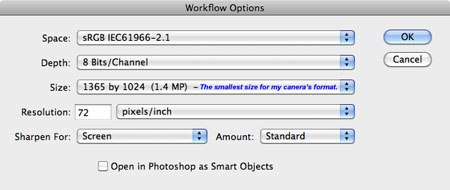
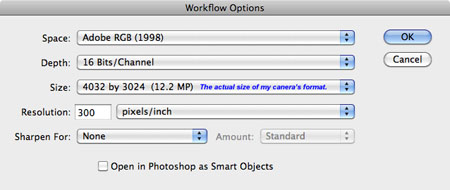
5 - Display JPEG Images. Once a project has been ACR processed, I re-open all the images in ACR or Lightroom and Save them to a "Work In Progress" folder having set suitable Workflow Options as shown here - photography workflow
I have set up my websites in such a way as to make it very difficult to "steal" my images but I apply a visible watermark using a Photoshop Action nonetheless. When it comes to social networks such as Facebook, I apply additional information so there can be no doubt about ownership - again using a Photoshop Action.
These PS actions include commands to Save the "website ready" jpeg images to an appropriate gallery folder (selected using the keywords applied at 3 above) - Photos-of-Boats.com, Landscapes, Facebook etc. Once all the images in the WIP folder have been processed in this way, they are trashed. photography workflow
| Backup to Computer's External Hard Disk |
6 - Process specific images to TIFF. Any images to be printed or in need of further work, such as my "Celebration Prints" series or where I want to apply special artistic effects, are processed in Photoshop.
The raw file(s) is re-opened in ACR from the "Processed" folder using the following Workflow Options - photography workflow
- Whereas sRGB is more suitable for display on a screen I prefer to print using the broader gamut of RGB and set this in my cameras as well.
- Working at 16 Bits/Channel gives better gradation which is important for some of the work that I do. When PS work on the image is completed, I convert it to 8 Bits.
- Having applied some sharpening in ACR I don't often
need to apply any more for printing but when it's necessary, I mainly
use the Smart Sharpen filter with care.
These images are now labelled Green.
Oh. By the way, have I
said it before?
| Backup to
Computer's External Hard Disk |
7 - Print and/or assemble for a PhotoBook.
8 - Project Completed. Well, completed for the time being anyway. At this stage I bin the images which were not selected and labelled Red.
Only now do I re-format (as opposed to deleting which slows down write speed) the original memory card from the camera and I often leave that until it's needed again. It's just another level of protection against disaster.
As I said, this works for me and I hope it helps you, albeit in an adapted form. photography workflow
|
AND
FINALLY - CONSIDER DOUBLE PROTECTION
Last month my PC
crashed - the platter
arm on the hard drive worked loose, destroying all programs and data.
photography workflow Fortunately, I was able to recover most of my valuable data and applications from my external hard drive BUT NOT ALL OF IT. Were it not for the additional protection I had by using the excellent file sharing, storage and collaboration solution - DropBox, I would have lost some critical files for ever. |

 |
![]()
| Image of the Month |
 |
| Click here to download it. |
| Find It |

Custom Search
|
| All of the advice, tutorials, masterclasses and ideas on this website are available to you at no charge. Even so, its upkeep does incur costs. |
|
| If you feel that
the site has helped you then any contribution you make, however small,
would go towards its ongoing maintenance and development. Thanks for your help. |
| Book of the Month |
 |
| Click here to read the review. |
|
|
New! Comments
Have your say about what you just read! Leave me a comment in the box below.