Photo Editing
"Making Better Photographs"
Photo editing is what you need if you are a “point and shoot” then “live with what you get” photographer who would like improve a photo or achieve results that are a bit more interesting.
(If you are a more experienced photographer there might be something here for you too - no one will let on if you take a peek!)
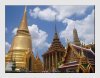
For example, straightening verticals so that buildings don't appear to be falling backwards :-


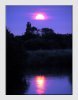
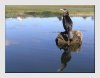
or producing an artistic image from a fairly uninteresting photo :-


The photos in this section are taken by ordinary people with ordinary cameras. Grateful thanks go to all those who have submitted their work for possible inclusion in this section. There is nothing really wrong with these photos but after viewing the results more closely, the “if only” creeps in -
If only I had been standing back a bit.
If only I had used a tripod.
If only I had used flash.
If only that bright red chair hadn’t been in the photo.
If only the horizon didn’t slope.
If only the final picture was a bit more stunning.
If only .....
Most of these situations can be handled by using photo editing software. Before digital technology came along, there was a limited amount that could be done using an enlarger with filters, masks and other manual devices; but the era of film and smelly chemicals seems to be drawing to a close.
Nowadays we have computer software which can be used to achieve far more - ranging from simple improvements to dramatic effects.
Photo editing techniques can be applied to all photos, whether taken by a digital camera or scanned from the negative or print from a film camera.
The software which is used by most professional photographers is Adobe Photoshop. There are essentially two versions - the pro one which costs hundreds of pounds and Photoshop Elements which does most of the things an enthusiast could wish for at about one tenth the price.
This section does not attempt to teach the basics of using photo editing software, there are many books, DVDs, tutorials and classes available which do that and most software comes with the instructions you need to get started. What you will find here is ideas on how to apply what you have learned in order to achieve images that you will be proud of and others will admire.
In the following examples the original photograph is shown along with the “if only” observations. This is followed by the steps taken using Photoshop to address these observations leading to a finished image which might look better framed and displayed than ”stuck in the album to be forgotten in the cupboard”.
There are short cuts and special tools available in Photoshop for the more common functions. The examples you will find here make only minimal use of these so that the techniques can be fully understood before progressing to greater productivity.
If you have any problems with the examples demonstrated below or if you would like to see a particular technique explained then click here and tell me about it.
Quick Fixes -

Converging Verticals
Red Eye Removal
Too Dark

|

|

|
| Sloping Horizon | Image Sizing | Remove Distractions |
Effects and Tricky Situations -

Picture Frame
Monochrome Conversion
Image Extraction

|
|

|
| Artistic Images | Improving Composition | Depth of Field |
Recommended tutorial books to take you to the next level and beyond.
Return from Photo Editing to Better Photographs Home Page.
 |
| Image of the Month |
 |
| Click here to download it. |
| Find It |

Custom Search
|
| All of the advice, tutorials, masterclasses and ideas on this website are available to you at no charge. Even so, its upkeep does incur costs. |
|
| If you feel that the site has helped you then any contribution you make, however small, would go towards its ongoing maintenance and development. Thanks for your help. |
| Book of the Month |
 |
| Click here to read the review. |

New! Comments
Have your say about what you just read! Leave me a comment in the box below.