Focus
"Controlling the Lens”
As we saw in the Exposure section our eyes focus and adjust to brightness very quickly when we look at something. In photography, things are very similar.
Most modern cameras have automatic lenses so we don’t have to worry about setting the focus. Nevertheless, it’s worth knowing how lenses work so that we can set up a manual camera correctly if we need to and for one other very important reason - DEPTH OF FIELD.
Knowing about Depth of Field and how to use it can make the difference between a so so snapshot and an outstanding photograph.
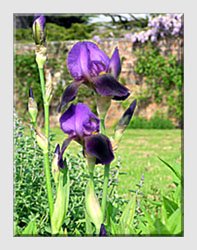
Compare these two images -
 |
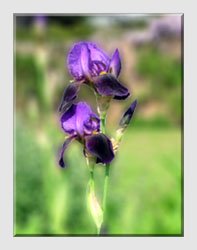 |
Notice how the iris flower on the left doesn’t stand out against the background, like the one on the right.
These photographs were taken using the same camera in the same position, within a few seconds of one another. The foreground and background of the one on the right is much more blurred, and therefore less distracting, than the one on the left.
Composition, lighting and exposure are the same for both shots but by knowing how to control Depth of Field, we can vary the appearance of the final image.
If your camera allows you to adjust the aperture, try photographing the same scene using the largest aperture (low number such as f2.8) and the smallest aperture (high number such as f22.0). If your camera does not allow you to adjust the aperture in this way, it might have settings for subject type; such as "Portrait" and "Landscape" - using these will give you similar results.
How is it that the same lens on the same camera can produce such different results?


This diagram shows how the camera (or the part that matters most in Depth of Field) was set up for the picture on the left. Notice that it uses a small aperture.
Because the light from the whole scene only passes through the central part of the lens where the glass is relatively flat, most if not all of the scene is sharp or “in focus”.
The parts of the subject that are sharp in the final image are said to be within the Depth of Field.
Usually this depth extends further behind the actual point of focus (in this case the flower) than it does in front.
It follows that if we want most of a scene to be “in focus” then we need a small aperture.
Now we can see the effect of using a large aperture setting on the camera.


Notice that the light from the scene passes through the outer edges of the lens where the glass is more curved.
Because of this, the parts of the scene that are sharp extend only a short way either side of the actual point of focus.
We can use this characteristic of a lens to our advantage.
When taking someone’s portrait it’s often better to isolate the person from their surroundings.
As we see here, the flower stands out well against the wall when we use a wide aperture to produce a shallow depth of field.
|
|
As with composition, lighting and exposure, it’s best to try these things out - so have a go.
It won’t be long before you will be taking better photographs now you know how the professionals do it.
Visit the DOF Master to find the Depth of Field for your camera. Return from Focus to the Photography Techniques page.
 |
| Image of the Month |
 |
| Click here to download it. |
| Find It |

Custom Search
|
| All of the advice, tutorials, masterclasses and ideas on this website are available to you at no charge. Even so, its upkeep does incur costs. |
|
| If you feel that the site has helped you then any contribution you make, however small, would go towards its ongoing maintenance and development. Thanks for your help. |
| Book of the Month |
 |
| Click here to read the review. |

New! Comments
Have your say about what you just read! Leave me a comment in the box below.