Super Macro Photography
"Up Close with Greater Depth"Article and Images by Dr John McCormack ARPS
Macro photography (and close-up photography) can be made difficult because of the small depth of field (DOF) inherent in high magnification techniques. Whist blurred out of focus areas can enhance a picture designed for creative effect, many close-up and macro photography techniques are used to show the greatest detail, and this calls for as high a degree of sharpness as possible.
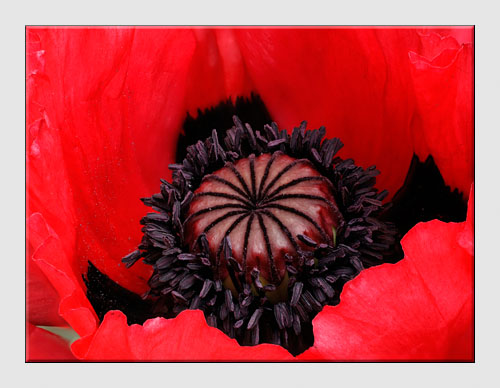
Flower photography is a typical example of exacting close-up and macro range imaging, in which depth of field has great importance in showing different parts of flower anatomy in optimum resolution. The technique outlined below can be applied to any close-up photography where there are problems in obtaining deep focus.
Many flowers of around 24 mm across will comfortably fill the frame of a digital single lens reflex sensor at 1:1 ratio. At this magnification there will be a very limited depth of field. Depending on the actual lens used, at f8 this can be as small as 0.6mm. By closing down the aperture there will be more in focus. A dedicated close up lens can well be closed down to f 32 when a DOF of about 2.3mm can be expected.
This closing of the aperture would appear at first sight to be the solution, but at smaller apertures the whole picture begins to lose sharpness because of a phenomenon known as diffraction. This is the inability of a very small lens aperture to produce a well defined image due to light bending and spreading out at narrow diaphragm openings. Added to this, a small aperture opening means a longer exposure time, with all the problems inherent in producing a very accurate image, with no trace of movement (particularly noticeable in macro photography). In flower photography splayed out stamens and other flower parts can easily exceed 5 mm and therefore parts of the flower will often be out of focus at any aperture setting.
In practice nearly all photographic lenses will work best in the middle range of their aperture rating, f8 or at the most f11 will give optimum results.
Digital Enhancement of Depth of Field macro photography
This constraint of depth of field becomes more critical in the microscopy world, where many times greater magnification is used than with standard photographic techniques.
Efforts have been made in recent years to overcome this problem of limited depth of field. Digital photography and its computerized software has now provided part of the answer. It is now possible to take multiple photographs down a microscope, using the microscope stage to move the plane of focus at each exposure. The software then recombines the images of this sequence, or stack of pictures to produce a single resultant picture with a greatly increased depth of field compared to each individual exposure. Stepping motors are available to achieve very accurate focus selection.
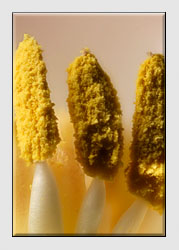
This method can be simplified and is transferable to our close-up and macro photography work. The principle is that the software uses the 'in -focus' part
of each exposure and isolates this part of each picture. Every separate image
is then amalgamated with its immediately adjacent picture, to build up a
combined photograph with a final blend which is compounded of the optimum
components of all the individual exposures. The software first of all uses
various contrast or edge detection algorithms to find the sharpest pixel
elements in each layer of the stack, and to discard the remaining blurred
image parts.
The second phase is then to combine each new sharp layer to its adjacent adjusted sharp layer, to build up a final picture, which now has an overall combination of a greatly increased depth of field in sharp focus.
All this can be achieved manually by hand selection and composition in Photoshop, but it is a long and tedious regime when many picture elements are involved. Fortunately work by those involved in microscopy have introduced several software packages to automate and simplify these procedures. This whole routine is not very dissimilar to the building up of a digital panoramic image from a number of wide angle exposures, built up side by side to make a horizontally composite picture. In this case however the final image is a composite of a number of very narrow vertically arranged exposures used to build up the final image.
Softwaremacro photography macro photography macro photography
There are a number of commercially produced software packages available to aid in this practice. These are a few of them.
'Combine Z' is a freeware software package which allows automated edge detection and composition of images.
'Archemid', 'Helicon Focus' and 'Image-Pro Plus' are commercial software packages used in Microscopy. 'Auto Montage' (Synchroscopy) is an advanced commercial package costing several thousand dollars.
At moderate cost I have found 'Helicon Focus' will produce the images I am seeking, and furthermore a time limited free trial version can be downloaded from their website. This can be used for initial experiments. Although not exactly stand alone software; a camera which produces multiple images at different focal depths with associated dedicated software has been produced in Scandinavia and is marketed as 'FocOz'.
Hardwaremacro photography macro photography macro photography
My aim has been to produce deep focus photographs of flowers and flower parts, using readily obtainable camera and accessory hardware and to capture images for the Helicon software. I have called this Super Macro photography. The major problem of all accurate macro photography is to assemble a completely vibration free set up to take the pictures. This often involves a degree of DIY to produce a stand for camera and subject in completely judder free fixed alignment. This is called an 'optical bench' and is usually superior to a tripod.
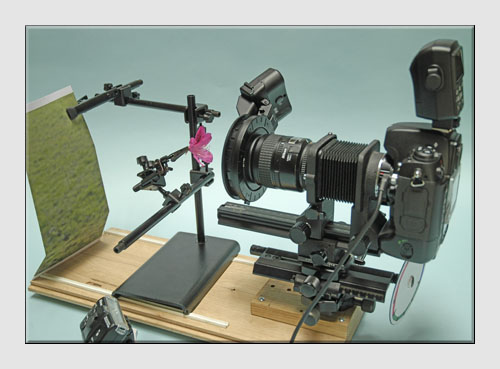
In this case the camera is mounted on one end of a lead screw on a horizontal stand. This arrangement enables it to be shifted a small amount for each exposure. I am at the moment using a Manfrotto micro focusing rail for this purpose. It is usually best to move the camera, not the subject, so that flower illumination angles are not changed between exposures. The whole arrangement is mounted on rubber supports on a reverberation free table. An electronic or similar shutter release is mandatory.
Click here for more information about the Macro Photography Equipment used in this Masterclass.Practical detailsmacro photography macro photography
It is almost impossible to find a vibration and wind free environment outside in the garden, because of the number of images required without any trace of plant movement. A plant in a conservatory or greenhouse is excellent, or else picked flowers can be used. As a last resort a garden plant can be dug up, photographed, and then replanted after the photography. The ideal is to aim for laboratory like conditions for the exposure sequence. Depending on the magnification and depth of field required, exposures may number from 5 to even 50 to produce the final picture.
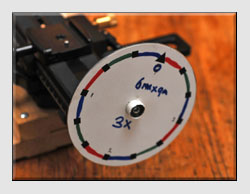
To move the camera an exact amount a circular calibrated disk like a clock face is composed on a computer and mounted onto the adjustment lead screw of the Manfrotto rail. In practice this scale is made and glued onto a CD disk which is then slipped over the adjustment screw head. This is used to rotate the screw and advance it a calculated set amount for each exposure.
If 1:1 ratio enlargement is to be produced on a 24mm wide sensor at f8 then the depth of field will be about 0.6mm as stated above. It is necessary however to allow for an overlap of about 25% for each successive frame so that a camera movement of 0.45mm could well be ideal. The pitch of the Manfrotto screw is such that each rotation will move the camera 1.25mm. It is necessary to carry out some trials to determine the shift necessary for individual set ups.
The approximate DOF can be found with most lens instruction data. Higher magnifications require smaller camera shifts with equivalent adjustments for overlapping frames. The total number of exposures for each subject can then be easily calculated by exposing enough pictures to adequately traverse the required field. With this same arrangement at a 4X magnification the camera shift will be about 0.075mm.allowing for adequate overlapping. The technique to obtain multiple images at this level can be very exacting.
The rail screw must be carefully lubricated. Then the lateral spring loaded pressure adjustment screw has to be regulated to prevent any possible lateral free play during the camera movement sequence. It is recommended that tiff images are used in preference to jpegs. which are of course compressed and recompressed each time they are saved. Not only is there resultant image degradation, but the software algorithms are said to work best on the original unadulterated pixel arrangement of tiff or raw images.
Although this results in a stack of huge image files, the software only actually selects and works on one image at a time. In fact actual working memory requirements will be met by most modern computers. It is essential that the lighting is absolutely the same for all the images. Modern diffused macro flash units have been found to be ideal, especially if there is not a completely even ambient daylight. With careful adjustment over exposure can be avoided, even with white or light yellow petals which have previously been notoriously difficult to photograph with flash. White balance should be preset preferably using a grey card and not left to automatic adjustment.
Exposure and Focus should also be manually set and locked, to avoid any variability in exposure from frame to frame.
A 60 mm macro lens will work well in natural light, but for really close up work using more than one flash, a 105mm macro lens will give better space for adjusting the set up of the flash arrangement. Unlike usual close up photography, we are here not concerned with a short focus lens and small aperture to give optimum DOF. For the more extreme macro pictures fill in lateral flash is really essential, to show up flower anatomy features in the greatest detail.
A valuable additional asset is the ability to capture the image directly into a laptop computer. This enables different lighting set ups to be seen and evaluated immediately. Even more important, the exposure histogram is available for direct viewing at an enlarged scale. This is critical for adjusting the lighting, and the curves of the individual RBG colours can also be examined to avoid any over exposure. I have found that these preliminary pictures can be more easily captured as low resolution jpegs, before taking the final tiff sequences. I use Nikon Capture software for this purpose, and this also allows the actual exposure to be triggered from the laptop.
The Image Processing Sequencemacro photography macro photography
A file is prepared on the laptop to receive the stack of pictures in their sequential order. This can then be opened by the dedicated Helicon software. Before the images are 'processed' it is preferable to open thumbnail pictures quickly one after the other in the software pre-conversion viewing screen, rather like a slow motion film sequence. This allows immediate appraisal of the picture cycle. Illumination must be even over the whole sequence, and any image which 'jumps' slightly out of alignment can be easily noticed. This is a quite frequent occurrence when photographing plants. They can so very easily be accidentally moved by a small fraction during this lengthy procedure. The actual turgidity of petals and flower parts can even change if a flower is out of water for any length of time in a warm environment, so the flower can droop. This can lead to failure of the sequence. One must sometimes be prepared to spend a long time taking and retaking pictures to obtain an optimum result.
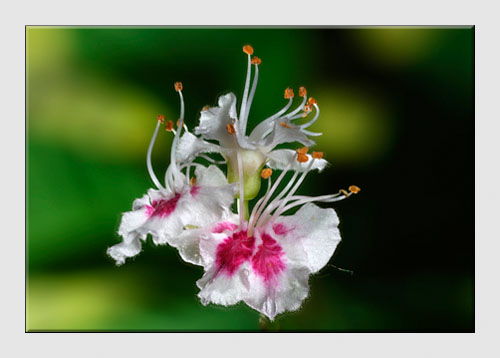
After the final composite picture is produced, further work is nearly always needed to clean up the image. The smallest speck of dust on subject or camera sensor will result in a snail track of blurred artifact spots. These have to be carefully removed in Photoshop or similar image adjustment programme. I have found that the sensor needs cleaning quite often if bellows are used, presumably because it pumps minute quantities of dust in and out of the camera. Greenhouses and garden environments are rarely dust free! Another blemish is a minor peripheral image ghosting which can sometimes occur at one edge or the other of a petal or flower part. These peripheral faint halo artifacts are caused by the shunting of pixels a minute amount, in an attempt by the software to correct shifts in the different focused levels, from one picture to the next. These defects have to be removed, usually by careful pixel cloning.
A final refined image can often take several hours to produce from setting up the camera to the final acceptable picture. However these resultant close ups pictures have an extraordinary depth of field and would be nearly impossible to obtain except by this method of combining multiple images. It will disclose stunning features of flower anatomy. Using a twelve mega pixel camera (Nikon D2X) A1 size prints can be obtained unsurpassed by any other method. There is frequently a unique optical perspective due to the panning of the camera across the flower surface. Our normal human reference view has been changed perhaps to what a butterfly or bee might see when foraging.
More of John's excellent Super Macro
Photography images can be seen in the Gallery
of Better Photographs.
Return from Super Macro Photography to Photography Masterclass.
 |
| Image of the Month |
 |
| Click here to download it. |
| Find It |

Custom Search
|
| All of the advice, tutorials, masterclasses and ideas on this website are available to you at no charge. Even so, its upkeep does incur costs. |
|
| If you feel that the site has helped you then any contribution you make, however small, would go towards its ongoing maintenance and development. Thanks for your help. |
| Book of the Month |
 |
| Click here to read the review. |
